Tips & Tricks for Equine Wound Bandaging
Please note that we always recommend consulting your veterinarian if your horse sustains an injury that requires bandaging. Your veterinarian will be best equipped to evaluate the injury and recommend a bandage type and frequency to suit your individual horse’s needs. Additionally, if you are not experienced with wrapping legs, you’ll want to have someone help you until you become more proficient, as incorrect wrapping can cause serious damage to your horse’s legs.
As a longtime horse owner, I’ve dealt with my fair share of injuries in my horses, but most recently my mare suffered a deep leg wound that required significant bandaging and care. After watching the veterinarian apply the initial bandage, I knew it would be a long road to recovery based on the size of the wound and its location.
My mare’s cut was located on the front of her fetlock, a notoriously difficult place to wrap due to its high level of motion (directly on the joint) as well as the proximity to the ground and all of the muck and mud that entails. For these reasons, we needed to keep her leg wrapped at all times. Instead of keeping her locked in a stall for weeks, her vet and I came up with a bandaging plan that allowed her to keep her wound clean and dry but also enjoy her regular turnout schedule with friends. I’ve learned a lot from this experience, and am sharing my tips here to help other horse owners who might be in a similar situation.
My first tip is to make sure you have all of the right tools and have them organized and readily available. A small tote like this SmartPak grooming tote or other container is a must to keep all of your supplies clean, dry, and right where you need them. This also allows you to easily keep track of your inventory and ensure you can reorder as needed. You don’t want to get halfway through wrapping only to find that you don’t have any more self-adhesive bandages!
After cleaning the wound and applying any recommended topicals, the next step is to apply a sterile non-stick Telfa pad over the wound, to prevent the rest of the bandage from sticking (which could delay healing). This is also important to help ensure your horse’s comfort, since anything that sticks to the wound during movement can be painful.
Next, you’ll want to secure the non-stick pad by applying a roll of soft sterile gauze bandage. Both the non-stick pads and rolled gauze can be purchased at your local pharmacy or anywhere that offers first aid supplies. You’ll want to spring for the higher quality options here, as they tend to be more durable and stay in place better. When applying the gauze bandage, it is important to unroll it from the front of the leg towards the back and make sure it is not too tight, to prevent binding along the tendons and ligaments. You’ll also want to make sure that you use a figure eight pattern if you are wrapping around a joint to allow for normal movement.
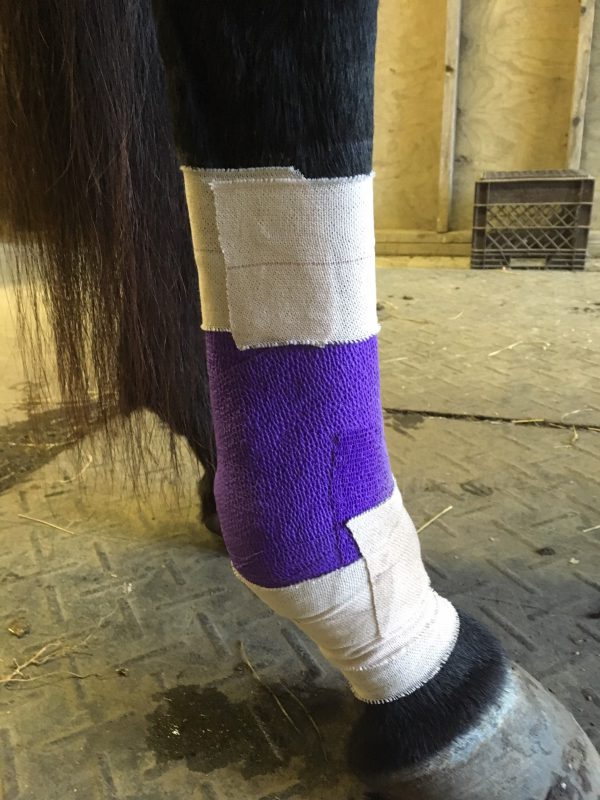
After applying the gauze, my next layer is a self-adhesive bandage such as 3M Vetrap or PowerFlex Bandage. Here is where you can let your horse’s personality shine- my favorites for my mare are either purple or pink glitter. If you’re going to be stuck bandaging for weeks, you might as well have fun with it right? Bright colors also allow you to see if the bandage is still intact from a distance, which can be handy. You’ll want to apply this layer of bandage to completely cover the gauze underneath.
Lastly, my favorite “outer layer” is to use Elastikon Bandage Tape to secure everything. Depending on your horse’s situation, you can cover the entire bandage in Elastikon for the ultimate protection, or just use it to secure the top and the bottom of the bandage. The major advantage of Elastikon is that it contains both elastic fibers and a rubber-based adhesive, making it both sticky (on the underside) and flexible.
Regardless of which way you use it, you’ll want to start at the top of the bandage. To secure your lower layers and keep the bandage from slipping, you’ll want to place half of the sitcky adhesive directly against the horse’s skin, and the other half on top of your Vetwrap layer. There’s a handy red line down the middle of the Elastikon roll that you can use as a guide for this! Wrap at least twice around the top before continuing down the bandage to make sure it’s secure. Using Elastikon at the bottom of your bandage is particularly helpful for keeping any contaminants from getting into the wound, and for keeping your non-stick pad in place underneath. By securing the bottom, you help keep all of the layers in and the dirt out! You can also watch my video about Elastikon Bandage Tape to see how it’s used:
Now that your bandage is complete, it is important to monitor it closely and ensure it doesn’t loosen, slip, or become wet/soiled. Even the best bandages can deteriorate over time, especially if your horse is highly active or interested in removing it! It is essential to change your horse’s bandage regularly according to the schedule your veterinarian prescribed, or anytime it becomes wet, dirty, or shifted. If you have any concerns about your horse’s bandage or wound, contact your veterinarian immediately for advice.
I hope you’ve found these tips helpful, and that your horse is on the road to recovery soon!